

by Jessica Pigza
Disclaimer: The below photos have NOT been retouched. Any change in skin color is due to lighting. My skin is not perfect, but I’m working on it 😊And results may vary, everyone’s skin is different so be sure to consult with your technician before starting any treatment.
I have peach fuzz on my face, but don’t we all? I would often think of different ways I could get rid of it, waxing, shaving or threading, but then life and three children would get in the way of any follow through. It wasn’t until a recent trip from the cold of Pennsylvania to the warmth of Florida that my husband, although playfully, pointed out my how noticeable my peach fuzz was in the sun. Now I know my husband well enough (we’ve been together for 19 years ) to know he didn’t mean ANYTHING by it but it did get me thinking. I’ve always wanted to do something about it, and now that all my kids are all in school, I could finally have the alone time to go get something done about it.
When we got back from FL I dove into researching the best and least painful way to get rid of the aforementioned facial peach fuzz. I finally landed on Dermaplaning as what seemed like the least painful approach.
What is Dermaplaning?

Dermaplaning is a process by which a medical grade blade is used to resurface skin by scraping away most of the epidermis, the outermost layer of skin. It’s similar to microdermabrasion but with the added bonus of hair removal and it’s considered a gentler process. This procedure is able to be done on all skin types and can stimulate collagen production which can help reduce wrinkles and improve skin quality. The whole process takes about 40-50 minutes with very little redness afterward making it a procedure that doesn’t make you feel like you need to hide from the world for a little bit. This treatment is recommended every 2-3 weeks for the first couple times and then every 4-8 weeks after for maintenance.
Where to Go
Now that I knew what I wanted, I needed to find a place to have it done. Unfortunately, this service is not offered everywhere and it’s important to find a place you trust and that completely knows what they are doing. Check with your local spas or dermatologist to see if they offer this treatment. Applying the right amount of pressure is the difference between having a successful procedure and cutting your face up.
I ended up choosing The Spa at Aestique, a well-known spa and surgical center that I had gone to before for other services. Typically, prices for dermaplaning can run anywhere from $60 – $150 or even more depending on where you get it done. Ovie was the amazing lady that did my treatment and she was a wealth of knowledge and very patient and helpful in answering my questions about the procedure!
What to Expect
If you’ve ever had a facial, the room was the same setup. I got comfy on the table and Ovie explained the process to me. She began the treatment by cleansing my face and then going over it with a scrub to remove any dead skin cells. She then went a step further in the removal of dead skin cells by using a circular facial brush. Next, she wiped my face with two cotton pads soaked with alcohol to help to remove any excess oils – this process works best when the skin is super dry.

She began working through small sections of my face holding the skin taut to ensure a smooth blading experience. It didn’t hurt but I was feeling the effects of a super dry face and it was a bit tight. The biggest thing I noticed about the whole procedure was the sound. The sound of a blade scraping against my skin, while wasn’t bothersome, it was just weird. If this sounds like something that would make your skin crawl, bringing some earbuds to your appointment would be extremely helpful.

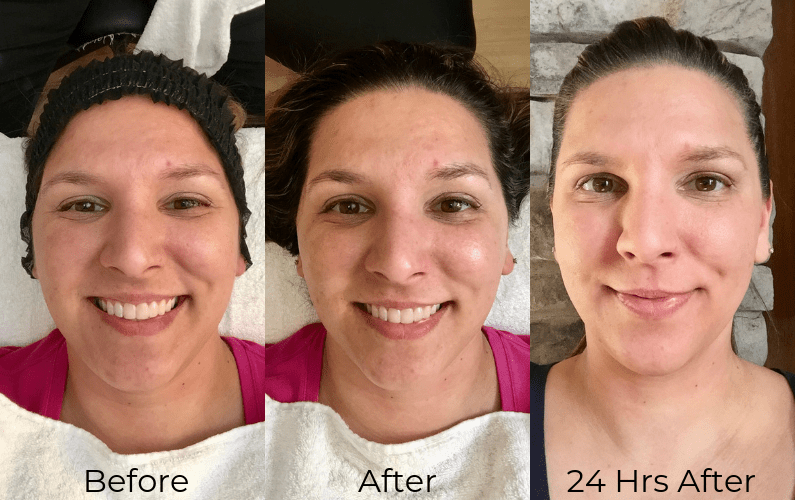
Close up of before and after.
After my session, she finished up with a moisturizer to replenish my skin and of course some SPF. While SPF is always important, it’s even more important to protect my now vulnerable skin.
I felt a little red and raw right after treatment but after moisturizing again at night and again the next morning my skin felt and looked a lot better.
The Days Following
The dryness on my face lasted for a few days and I moisturized like crazy. I did immediately notice though that my face had this new glow to it and my makeup went on smooth as butter and looked even better. I loved the silkiness of my jawline and that powder didn’t accumulate on the baby fine hairs of my forehead anymore.

I found relief in my Clinique Moisture Surge Moisturizer and protected my skin with my Supergoop Unseen Sunscreen SPF 40.
While I absolutely loved my new found skin, I didn’t know if this was something I could financially keep up every 4 weeks. That’s when I started looking into some home treatments. Could they possibly give me similar results to what the spa had done? I looked at tons of product reviews and watched a bunch of YouTube videos before I picked the two that I would try. While I knew I wouldn’t get the professional quality I experienced at the spa, I could at least get the hair removal, right?
Home Attempt #1

The first method I tried was using was the Shiseido Facial Razors. They come three to a pack and this particular order came with three packs. If you want to start out with only one pack you can find them here. They are disposable blades, however, each blade may be cleaned off and used a few times before being tossed. To clean rinse off under running water and then dip the blade in alcohol. They will run you about $6-10 dollars a pack depending on where you get them and it’s recommended that you do this every couple weeks.

I prepped my skin for this one much like they did at the spa. I started with clean, dry skin and then used an alcohol-soaked cotton pad all over my face. I worked in small sections, pulling up on my skin to keep it taut. I started with my “sideburns” trying to get the movements down before working to the center of my face, above my lip area and my forehead. While I know I didn’t do an as detailed job as the spa, (they even got all the peach fuzz from on my ears, behind my ears and down the back sides of my neck) I still think I did an okay job. The blade was a little hard to use but once I got my angles down it wasn’t too bad.
Home Attempt #2

The second method I tried was the Finishing Touch Flawless Facial Hair Remover. It surprised me how good the reviews were for this product and the YouTube videos made it look so effortless that I just had to try it. The remover comes in a few different colors and runs about $19.99 and works on all skin types yet boasts that it’s perfect for even the most sensitive skin.

To use just flip on the switch and place the top of the remover flat against your face and work in a circular motion over the areas of hair you want to remove. The only prep I would recommend before using this product is clean, dry skin but unlike using a blade, this remover is safe to use every couple days. When you’re done simply clean with the brush provided. Check out the before and after picture from using the Finishing Touch Flawless Facial Hair Remover! I thought it did an amazing job of getting rid of the peach fuzz on my face, it was super easy to use and absolutely zero pain!
The Verdict
Hands down I love the benefits of dermablading! I love that not only does it get rid of all my peach fuzz but that it enhances the overall look and feel of my skin. That being said, I also know it’s not always in my budget to do it every 4 weeks, which is why I’m so happy I also found these inexpensive home versions. Don’t get me wrong, I know that what I’m doing at home can’t even compare to professional grade, but to help keep my peach fuzz at bay, they will totally do! I know there will be more dermaplaning appointments with Ovie in my future, but until then, I at least know that I can handle my peach fuzz in the meantime.
Tips Before You Go
Put Your Retinol/Retin-A on Hold Before and After – Before going into any dermaplaning treatment it’s recommended that you stop using products that contain Retin-A/Retinol 3-4 days prior AND 1-2 days after to help with skin sensitivity.
No Scrubs or Microdermabrasion Pastes – It’s also recommended that you stay away from scrubs or microdermabrasion pastes for a few days prior as well. That being said, I was able to get in within one day of making my appointment which did not give me time to lay off the scrubs. In my case, I didn’t have any issues but if you think this may be one for you, be sure to schedule your appointment for a few days out.
Wait to Sweat – Try to avoid sweating or exercise up to 24 hours after treatment to avoid irritating your skin. The salt from your sweat may cause stinging on your fresh skin layers.
Repeat After Me ‘SPF’ – Again I will say this, make sure you apply your moisturizer and SPF vigilantly after your treatment. Your skin will be more vulnerable and you don’t want any sun damage to your fresh, new layers of skin. Your dermaplaning expert will apply some before you leave (or at least they should) but then it’s up to you after that.
Moisturize Your Lips Too – My lips and the area around them were pretty dry after my treatment and that’s probably the area that felt the most irritated. Stay away from lipsticks or glosses that are on the drying side and opt for some intense moisture like Aquaphor Lip Repair.
Tell us your thoughts on dermaplaning! Is this something you think you might try? Is this something you already do? What do you think about dermaplaning?


